Personalização do layout para o formulário incorporado
Para alinhar, horizontalemente os campos do formulário incorporado, pode usar os Flexbox em CSS , com a propriedade flex-direction valorizada a row.
Os campos de formulário incorporado são colocados em um ou mais contêineres:
<div class="flex-container">...</div>
Dentro de uma DIV parent:
<div class="kr-embedded">...</div>
Para mais informações, consulte o capítulo: CSS Flexbox (Flexible Box).
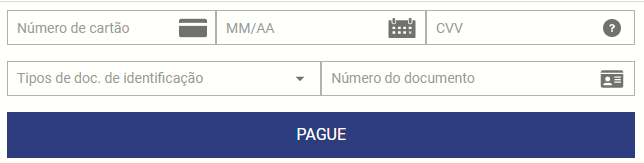
Uma visualização do layout horizontal dos campos incorporados:
Encontrará um exemplo de código, a título informativo:
<head>
    <!-- Javascript library. Should be loaded in head section -->
    <script type="text/javascript"
        src="https://static.lyra.com/static/js/krypton-client/V4.0/stable/kr-payment-form.min.js"
        kr-public-key="69876357:testpublickey_DEMOPUBLICKEY95me92597fd28tGD4r5:testpublickey_DEMOPUBLICKEY95me92597fd28tGD4r5">
    </script>

    <!-- theme and plugins. should be loaded in the HEAD section -->
    <link rel="stylesheet" href="https://static.lyra.com/static/js/krypton-client/V4.0/ext/classic-reset.min.css">
    <script type="text/javascript" src="https://static.lyra.com/static/js/krypton-client/V4.0/ext/classic.js"></script>


<style type="text/css">
/* choice the embedded size */
.kr-embedded {
	width: 33% !important;
}

/* CSS Flexbox (Flexible Box) */
.kr-embedded .flex-container {
	display: flex;
	flex-direction: row !important;
	justify-content: center;
	align-items: center;
}

/* to center the button with the class kr-payment-button */
.kr-embedded .kr-payment-button {
	display: block;
	margin-left: auto;
	margin-right: auto;
}

</style>
</head>
<body>
<!-- payment form -->
<div class="kr-embedded" kr-form-token="[GENERATED FORMTOKEN]">
	<!--new flex-container class to indicate a flex-direction: row  -->
	<div class="flex-container">
		<!-- payment form fields -->
		<div class="kr-pan"></div>
		<div class="kr-expiry"></div>
		<div class="kr-security-code"></div>
	</div>
	<!-- payment form submit button -->
	<button class="kr-payment-button"></button>
</div>
</body>
Personalização com um campo adicional: o e-mail
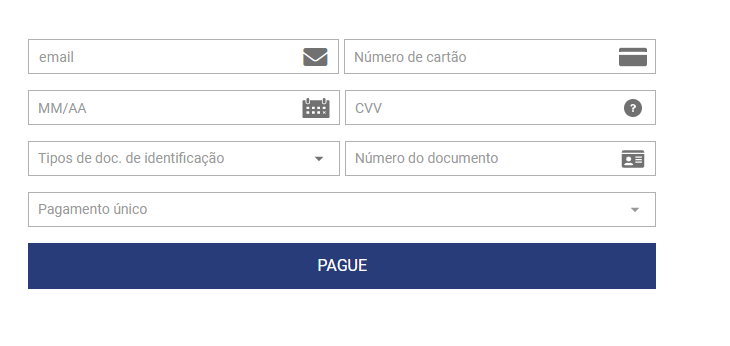
A título informativo, encontrará um exemplo do código, adicionando o campo email , como dado obrigatório.
<head>
<!-- Javascript library. Should be loaded in head section -->
<script type="text/javascript"
src="https://static.lyra.com/static/js/krypton-client/V4.0/stable/kr-payment-form.min.js"
kr-public-key="69876357:testpublickey_DEMOPUBLICKEY95me92597fd28tGD4r5:testpublickey_DEMOPUBLICKEY95me92597fd28tGD4r5">
</script>
<!-- theme and plugins. should be loaded in the HEAD section -->
<link rel="stylesheet" href="https://static.lyra.com/static/js/krypton-client/V4.0/ext/classic-reset.min.css">
<script type="text/javascript" src="https://static.lyra.com/static/js/krypton-client/V4.0/ext/classic.js"></script>
<link rel="stylesheet" id="extraStyleCDN" href="https://cdnjs.cloudflare.com/ajax/libs/font-awesome/5.1.1/css/all.min.css">
<style type="text/css">
/* to choice the embedded size */
.kr-embedded {
width: 33% !important;
}
/* to use the CSS Flexbox (Flexible Box) */
.kr-embedded .flex-container {
flex-direction: row !important;
justify-content: space-between;
width: 100%;
display: flex;
gap: 5px;
}
/* to have the email field the same width as the KR fields */
.kr-embedded .flex-container .kr-email {
width: 100%;
}
/* to center the button with the class kr-payment-button */
.kr-embedded .kr-payment-button {
margin-left: auto;
margin-right: auto;
display: block;
width: 100%;
}
</style>
</head>
<body>
<!-- payment form -->
<div class="kr-embedded" kr-form-token="[GENERATED FORMTOKEN]">
<!--new flex-container class to indicate a flex-direction: row -->
<div class="flex-container">
<div class="kr-email">
<input type="text" name="acme-email" placeholder="email" class="kr-theme" kr-icon="fas fa-envelope" required/>
</div>
<div class="kr-pan"></div>
</div>
<!--new flex-container class to indicate a flex-direction: row -->
<div class="flex-container">
<div class="kr-expiry"></div>
<div class="kr-security-code"></div>
</div>
<!-- payment form submit button -->
<button class="kr-payment-button"></button>
</div>
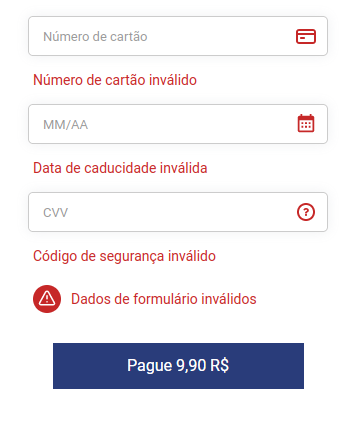
</body>Personalização no caso de digitação da dados inválidos
O formulário incorporado pode ser personalizado para avisar o comprador se forem inseridos dados inválidos.
Encontrará um exemplo de código, a título informativo: no Github clicando neste link:
O código permite exibir uma mensagem de aviso em vermelho , abaixo do campo incorporado em erro.