Configuring the Instant Payment Notification URL
- Sign in to the Wordpress Back Office.
- Go to WooCommerce > Settings.
- Click the Payments tab.
- Click Lyra - General configuration.
- Search for ACCESS TO THE PAYMENT GATEWAY section.
- Copy the URL from the Instant Payment Notification URL parameter.
- Sign in to the Expert Back Office Lyra: https://secure.lyra.com/portal/.
- Go to Settings > Notification rules.
- Double click on Instant Payment Notification URL at the end of the payment.
- Check the Automatic retry in case of failure box.
- Search for the Instant Payment Notification URL of the API form V1, V2 section.
- Paste the previously copied URL to URL to call in TEST mode and URL to call in PRODUCTION mode.If the production URL is different from your test URL, specify it in order to not forget it later. Your URL should look like this:https://www.your-domain.com/?wc-api=WC_Gateway_Lyra
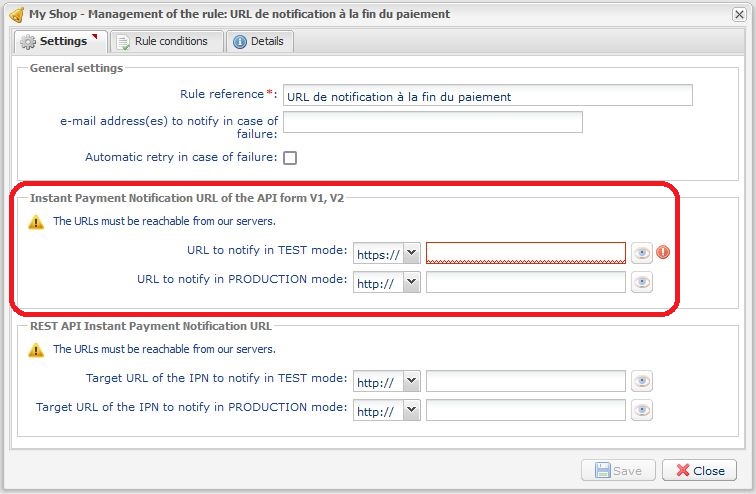
- Click Save.
- Double click on Instant Payment Notification URL on cancellation.
- Carry out the same operation from step 10 to step 13.
- Double click on Instant Payment Notification URL on batch change.
- Carry out the same operation from step 10 to step 13.
- Double click on Instant Payment Notification URL on an operation coming from the Back Office.
- Carry out the same operation from step 10 to step 13.
- Double click on Instant Payment Notification URL when creating a recurring payment.
- Carry out the same operation from step 10 to step 13.
- If the configured rules are marked by a red cross, select the rule and click on the Enable the rule button at the bottom of the screen.